Terminating Employees
Depending on if your company wants to see terminated employees within the current period in TimeStar™, the process for terminating employees is different. Please follow the steps below for the scenario that your company is using.
Scenario 1 – Your Company does not want to see terminated employees
Description of system functionality: Terminated employees will not be accessible in the employee list drop-down in the current period if the termination date is outside of the current period dates. A TimeStar™ user will not be able to see any terminated employees or run reports unless they are in a pay period when the employee was active.
To terminate an employee:
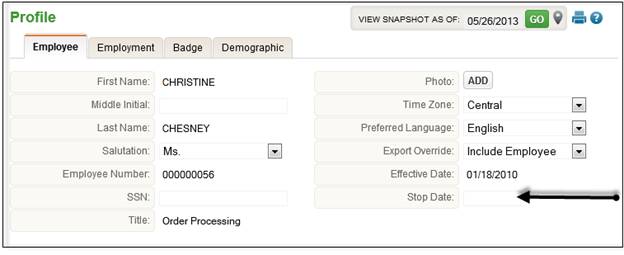
1. Select Employee Maintenance – Employee Information - Profile.
2. Select the employee from the drop-down.
3. If you have already cut a check for the employee’s last paycheck and do not want to export hours, select ‘Exclude Employee’ under the ‘Export Override’ drop-down.
4. Under the Employee tab, enter the last day of the pay period that the employee’s termination date falls within as the ‘Stop Date’.
5. Click the ‘Save’ button.
If the employee was terminated in a previous period, they will be removed from the employee list. If the employee is being terminated in the future, they will remain in the employee list until a pay period that does not include the termination date.
NOTE - If a stop date other than the last day of a pay period is entered, the following message will display “ATTENTION: The specified stop date falls within the middle of a pay period. This could possibly prevent approvals and/or payroll from successfully processing. The suggested value is last day of a pay period. Select ‘Cancel’ to change your entry or ‘OK’ to proceed anyway.”
Scenario 2 – Your Company wants to see terminated employees
Description of system functionality: A TimeStar™ user will have the ability to view terminated employees in any pay period in the system. A terminated employee pay group will be setup so that terminated employees will not generate holiday records.
NOTE -Your system must have the System Parameter setting ‘Auto Approve Employees with zero hours’ set to ‘True’. If this is not setup, terminated employees will generate errors when running Pay Period Close since hours will not be approved. Also, a terminated employee pay group must be created so these employees will not generate holiday pay records.
To terminate an employee:
1. Select Employee Maintenance – Employee Information - Profile.
2. Select the employee from the drop-down.
3. Select ‘Exclude Employee’ under the ‘Export Override’ drop-down.
4. Click the ‘Save’ button.
5. Select the Employment tab and change employee’s ‘Active Code’ to ‘Terminated’.
6. Enter any additional termination information.
7. Click the ‘Save’ button.
8. Go to the Employee Assignments – Groups page.
9. Enter the employee’s termination date as the stop date for the currently assigned pay group.
10. Click the ‘Save’ button.
11. Assign the Terminated Employee pay group with a start date of the day after the termination date.
12. Click the ‘Save’ button.
13. If applicable, set a stop date on the employee’s schedule group to the termination date.
14. If applicable, set a stop date on the employee’s supervisor assignments to the termination date.
Termination Wizard
NOTE - The termination wizard assumes that your company does not want to see terminated employees.
Please review scenario 1 and scenario 2 for termination process differences to determine the method to use to terminate an employee.
1. To terminate an employee using the termination wizard, select the employee from the drop-down.
2. Navigate to the Employee Information - Profile page.
3. Click the ‘Terminate’ button at the bottom of the screen.
4. The wizard will launch with the fields listed below.
5. Click the ‘Terminate’ button.

|
Field Name |
Description |
|
Last Active Pay Period |
The last pay period the employee was active in. |
|
Termination Date |
The last day of the employee's employment. |
|
Termination Code |
The reason for the employee's termination. Use the drop-down list to make a selection. |
|
Active Code |
The employee's active status. Defaults to ‘Terminated’. |
|
Deactivate User Account
|
Select this option to inactivate the employee's TimeStar™ user account. This option will only display if the employee is an active user in TimeStar™. |
|
Export Override |
Should the remaining hours be included in the payroll export file for the employee? Select ‘Exclude Employee’ to not export any hours in the current pay period. |