
New Employee
To add a new employee record, navigate to the Employee Maintenance – Employee Information - Employee Profile screen and click the ‘Add’ button in the lower right to launch the new employee detail screen.
The Employee tab will need to be completed before moving to any of the other tabs. All four fields on the first screen are required. The new employee will be added to the company currently selected in the company drop down list. If the wrong company is selected close the window and navigate to the company the employee should be added to.
The Employee tab contains the following:
|
Field Name |
Description |
|
Name |
Employee Name |
|
Pay Group |
The pay group the employee is assigned to. The pay group controls the calculation of all hours and punches within TimeStar™. |
|
Supervisory Level |
The level of supervisor the new employee is (i.e. employee, supervisor, manager, etc.) |
|
Effective Date |
The start date of the first pay period the employee is active. |
The Primary tab will display the following:

|
Field Name |
Description |
|
Employee Number |
Employee’s identification number within the company |
|
Badge Number |
Employee’s badge number |
|
Social Security Number |
The employee’s social security number. Note - this field may be required depending on the System Setup – System Parameters “Allow Blank SSN” value. |
|
Title |
Employee’s job title |
|
Time Zone |
Employee’s time zone. The time zone defaults to the time zone setup for the company. |
|
Export Override |
Employee’s export status – to include or not include the employee in the payroll export from TimeStar™. The payroll export status is defaulted to include the employee in the payroll export. |
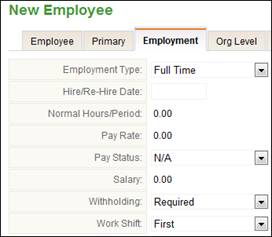
Administrators can enter information on the primary tab if necessary, the only required field is Export Override. On the Employment tab the following will information will display:
|
Field Name |
Description |
|
Employment Type |
Employee’s employment type (i.e. full time, part time, etc.) |
|
Hire Date/Re-Hire Date |
Employee’s hire date |
|
Normal Hours/Period |
Employee normal hours worked in a pay period |
|
Pay Rate |
Employee’s pay rate |
|
Pay Status |
Employee’s pay status (i.e. hourly, salary, etc.) |
|
Salary |
Employee’s annual salary |
|
Withholding |
Employee’s withholding status (i.e. required, exempt) |
|
Work Shift |
Employee’s shift code |
The Org Level tab will display the organization levels setup for your company. Select org level items to assign to the new employee if applicable.
NOTE - That organization level hierarchy is enforced, so assign organization level from the first level downward.

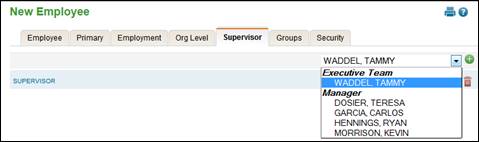
On the Supervisor tab,use the drop-down to assign supervisor(s) to the new employee. Supervisors will be grouped by the supervisor level and listed alphabetically within each supervisor level. When you have completed supervisor assignments continue to the Groups tab.
NOTE – When the user adding the new employee is a supervisor in the system a message will appear asking “Assign yourself as a supervisor to this employee?” At this point, click ‘OK’ to add the user logged in as a supervisor or click ‘Cancel’ to return to the new employee wizard.
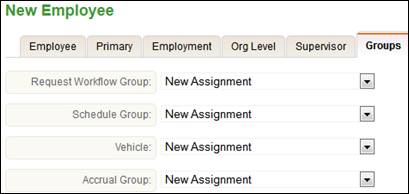
The Groups tab will display different groups that are setup for your company. If the company uses a specific request workflow group administrators can assign it here. If the company uses schedules, then select the schedule group to assign. If your company applies accruals, select the employee’s accrual group assignment.
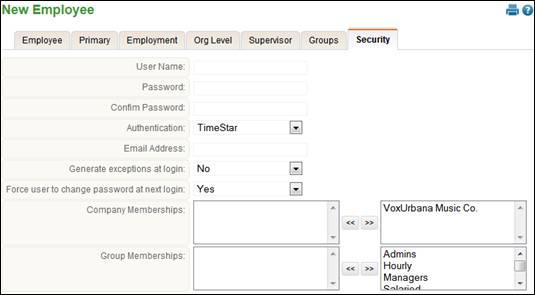
The Security tab will need to be completed to create a user in TimeStar™. A TimeStar™ user can be added for the new employee from this window. This tab can be left blank if a user chooses to not create a user for the employee at this time. Administrators can add users to multiple employees at once via the Global Update – User Update page see Global Update section for details. The following fields display on this tab:
|
Field Name |
Description |
|
User Name |
Enter username. This data is case sensitive. |
|
Password |
Enter password. This data is case sensitive. |
|
Confirm Password |
Confirm password. This data is case sensitive. |
|
Authentication |
The default method is ‘TimeStar’ (use the TimeStar password). If your company utilizes LDAP authentication with TimeStar™, select ‘LDAP’. If your company utilizes strong password rules within TimeStar™, select ‘TimeStar – Strong Passwords’. |
|
Email Address |
Enter email address. |
|
Generate exceptions at login |
Select ‘Yes’ to generate alerts upon login. |
|
Force user to change password at next login |
Select ‘Yes’ to force the user to change their password at the next login. |
|
Company Memberships |
Select the default company |
|
Group Memberships |
Select the security group the user belongs to. |
When you have completed your entries, click the ‘Save’ button. If there are any sections you have not completed, a pop-up message will appear stating what tabs were not changed; click ‘OK’ to add the employee to the system.
NOTE - Not all fields must be completed when entering a new employee. In addition, certain fields may be hidden from view for users (such as pay rate and salary). See the Security Setup chapter for more information on limiting the fields viewable within TimeStar™.