User Update
The User Update page allows users to generate TimeStar™ users and/or assign user alerts with one step.
This procedure will create user logins and passwords for employees.

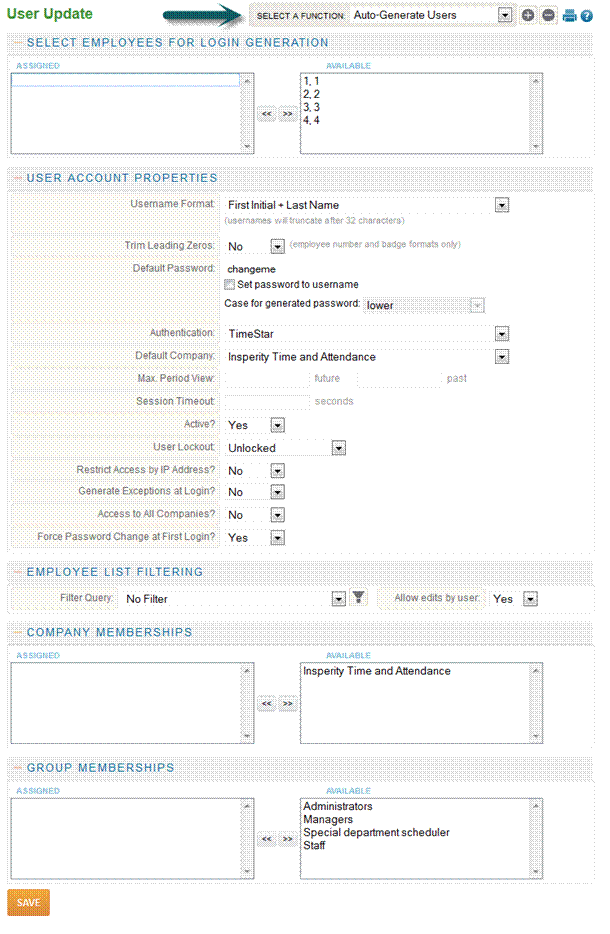
1. Select Global Update - User Update.
2. Only the employees who do not have user names will appear in the list on the right side of the screen.
3. Select the employees to generate user names for by selecting the name and clicking the arrows to move the name into the left selection box.
NOTE - Select only the employees with same access rights together.
4. Use the ‘Username Format’ drop-down and select the username format.
5. You may change the default password and have the option to define whether the password will be set to lowercase or uppercase and if the password is set to the username.
6. If your company utilizes LDAP or TimeStar – Strong Passwords authentication within TimeStar™, you may update the ‘Authentication’ selection.
7. You may change the default company.
8. You do not need to edit Max Period View, Session Timeout, or User Lockout – these values will come from the user’s group.
9. Keep the ‘Restrict by IP Address’ set to ‘No’ – this must be assigned under ‘User Security’ to have logins restricted by IP address.
10. To have the user see alerts when they log in, select ‘Yes’ to ‘Generate Exceptions at Login’.
11. If the user must have access to all companies, select ‘Yes’ to ‘Access to All Companies’.
12. If the user should be forced to change his/her password at login select ‘Yes’
13. You may apply a ‘Filter Query’ if the users should only see certain employees other than those assigned to them (i.e. Pay Group or Department).
14. Select the ‘Company Memberships’ by highlighting the company’s name and clicking the arrows to move the record to the left side of the screen.
15. Select the ‘Group Memberships’ by highlighting the group’s name and clicking the arrows to move the record to the left side of the screen.
16. Click the ‘Save’ button.
This procedure will assign alerts for users in the system. When the user logs into TimeStar™, they would have the ability to see alerts on the home page.

To assign alerts to users of TimeStar™, the following steps must be taken:
1. Select Global Update – User Update.
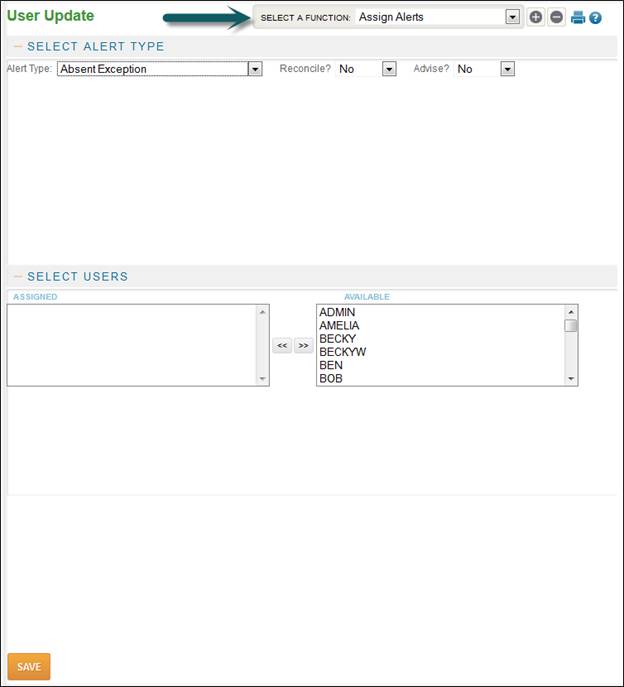
2. From the ‘Select a Function’ drop-down, select ‘Assign Alerts’.
3. Select the ‘Alert Type’ to add (for detailed descriptions, see Appendix B).
4. Select ‘Yes’ to reconcile to allow the user to correct this alert type.
5. Select ‘Yes’ to advise the user of this alert upon login.
6. The list of users will be listed in alphabetical (or numeric) order on the right side of the screen. Select the users to add this alert to by highlighting the user name and click the arrows to move the record to the left side of the screen.
7. Click the ‘Save’ button.