Schedules - Schedule Group
The steps for adding a Schedule Group are as follows:
1. Click Daily Procedures – Schedules – Schedule Group.
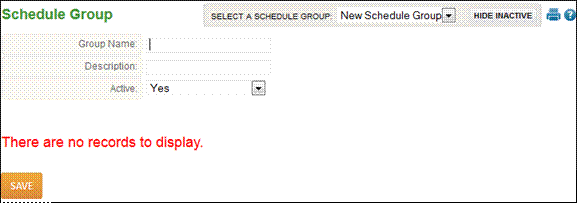
2. Click the ‘Add’ button. The following screen will display:
3. Enter the Group Name.
4. Enter the Description.
5. Select ‘Yes’ to the Active field, for the group to be active.
6. Click the ‘Save’ button.
To add schedules rules to a group, follow these steps:
1. Click Daily Procedures - Schedules - Schedule Group.
2. Select the Group to add schedules for in the Select a Schedule Group drop-down.
3. Click ‘New Rule’ button. The following window displays:
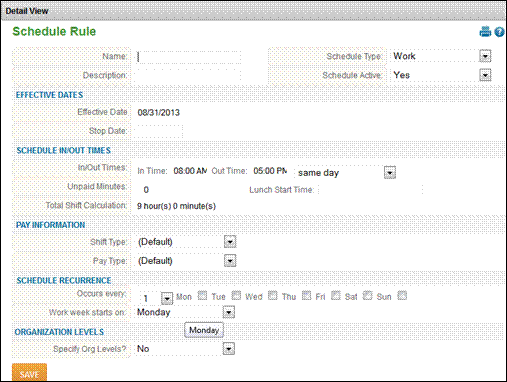
4. Enter the Name and Description for the schedule (i.e. 9-5).
5. Use the drop-down to assign the Schedule Type (Work or On-Call).
a. If the schedule is set as on-call, the employee will not display as absent if they do not come in as scheduled.
6. Enter the Start Date for the schedule in the Effective Date field.
7. Enter the In/Out times for the schedule.
8. Enter any Unpaid Lunch or break time and Lunch Start Time if applicable.
a. This value will be used for schedule reporting.
9. Select Shift Type and Pay Type if they are different than Default.
10. If the schedule is not rotating (i.e. works 9AM-5PM one week and 9:30AM-4:30PM the next on a continuing basis), the schedule should be set to occur every 1 week.
11. Select the days of the week the schedule applies to.
12. Use the drop-down to select the day the work week begins.
13. You may override organization levels if needed.
14. Click the ‘Save’ button.
NOTE – If an employee works different times on different days of the week, you will need to create multiple schedules (i.e. 9-5 Monday & Tuesday, 8:30-4:30 Wednesday-Friday, employee would have 2 schedule assignments).