Requests
Insperity TimeStar™ has integrated a request module to minimize data entry by supervisors and administrative personnel. You may also use this process to replace a manual paper tracking system for time off.
Employees may submit requests within TimeStar™. After the employee completes the request, a supervisor will receive a notification that a request has been submitted.
Supervisors may then approve or deny the request. At the time the request is approved or denied, a supervisor may enter comments or edit any data entered by the employee.
After the supervisor has replied to the request, the employee receives a notification detailing the supervisor’s response.
To setup requests to be sent to more than just the employees direct supervisor please see Company Setup – Request Setup – Request Workflow section or Appendix H.
NOTE – The notification that both the employee and supervisor receive can be setup as an email message. Please contact a TimeStar™ application consultant for more information.
Administrators of TimeStar™ will need to determine pay types that will be available to employees when requesting time off. Once the pay types have been established, the employees and supervisors will need access to the request option within TimeStar™.
To setup pay types for the request module, follow these steps:
1. Login to TimeStar™.
2. Go to System Setup - Reference Tables.
3. Use the drop-down in the upper right corner and select ‘Pay Types’.
4. Use horizontal scroll bar to view the ‘Request Flag’ header.
5. Use the drop-down in the ‘Request Flag’ column to set those pay types to be available for selection by employees to ‘Yes’.
6. Click the ‘Save’ button.
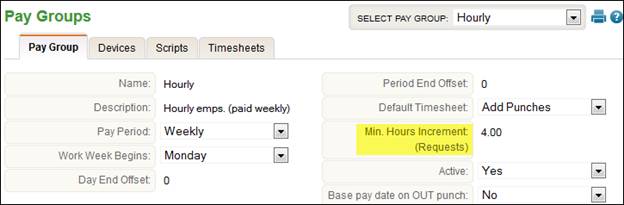
TimeStar™ may be configured to limit the increment of hours that may be requested by an employee. The request increment is setup by pay group in TimeStar™. To setup an increment, go to Company Setup – Pay Groups.
Update the ‘Min. Hours Increment (Requests)’ to the correct value and click ‘Save’.
In the case above an employee may request on the Daily Procedures – Requests page in increments of 4 (i.e. 4, 8, 12, 16, etc.). When an employee or supervisor attempts to enter a request for a non-valid amount, a prompt will display to correct the hours and the amount is automatically rounded to the nearest valid amount.
The request module may also be configured to display a disclaimer message for employees when submitting a request. Contact a TimeStar™ application consultant for assistance in setting up a disclaimer message.
After an employee’s request has been made, a notification will appear on the request icon for the employee’s supervisor.
There are five types of requests that can be submitted:
· Time Off: Time that will be added to an employee’s hours for a pay period (Examples are vacation, sick, bereavement)
· Schedule Change: Change to scheduled hours
· General Request: Send a message to a supervisor
· Missing Punch (optional): Fix an inaccurate punch or missed punch
· TimeStar™ Message (optional): Send a message to any user in TimeStar™
NOTE – Users who have access to the My Request Widget will be able to view and submit requests via the Widget. Please see the Widget section for more details.
Submitting a Time Off Request
To submit a Time Off Request, follow these steps:
1. Login to TimeStar™.
2. Click
the Requests icon![]() , or click Daily Procedures - Requests
on the TimeStar™ menu.
, or click Daily Procedures - Requests
on the TimeStar™ menu.
3. Click the ‘New Request’ button. The menu will open upwards and display additional options.
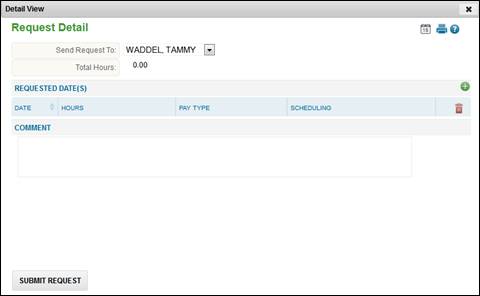
4. Click ‘Time Off Request’. The following window displays:
5. When
submitting or approving a request, if a user has access to the Daily Procedures
– Schedules - Time Off Calendar page, the ![]() icon
will appear on the detail screen so the Time Off Calendar may be accessed
when reviewing or entering a request.
icon
will appear on the detail screen so the Time Off Calendar may be accessed
when reviewing or entering a request.
6. Use the ‘Send Request To’ drop-down to select which supervisor to send your request to.
7. Click
the ![]() button
to open a calendar. The calendar window displays:
button
to open a calendar. The calendar window displays:
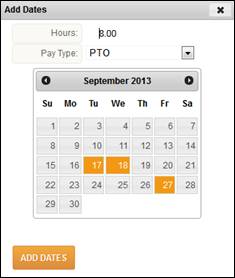
a. Add daily hours information.
b. Select Pay Type option.
c. Click and drag to select days (Selected dates will appear in orange).
d. Hold ‘Ctrl’ to add additional days from other weeks or months.
e. Click ‘Add Dates’ button to add the selected dates to the request screen. The following Request Detail will display:

f. Only one entry per pay type per day is allowed.
g. Click the close ‘X’ to cancel and return to the Requests page.
8. Select the ‘Pay Type’ for each day and modify hours, if needed.
9. To take a partial day, select ‘Partial Day’ from the ‘Scheduling’ drop-down list and enter a start time.
NOTE – If you are scheduled over midnight and have a schedule that includes break minutes, you may select the ‘Cancel Shift’ scheduling tab and enter a start time for the system to automatically cancel any contiguous schedule(s) within the start time + number of hours entered.
10. Click
the ![]() icon
to remove a certain day from the request.
icon
to remove a certain day from the request.
11. As needed, enter comments for your supervisor.
12. Click ‘Submit Request’. You will receive a message that the request has been sent to your supervisor and the request will be listed on the Requests page with a status of unanswered.
NOTE – If an employee is entering a request for over 24 hours on one day, a message will appear stating “This request is for more than 24 hours on a single day, are you sure you wish to continue?”
· If the employee selects ‘OK’ to this message, the supervisor will receive the same prompt when approving the request.
· If an employee is requesting more than one day of time off, it is recommended that the employee separate out the requested date(s) to ensure schedule deviations and hours records are created accurately.
After the supervisor has responded to the request(s) entered, the user will receive a notification on the ‘Requests’ area on the home page.
Submitting a Schedule Change Request
To submit a Schedule Change Request, follow these steps:
1. Login to TimeStar™.
2. Click
the Requests icon ![]() , or click Daily Procedure - Requests
on the TimeStar™ menu.
, or click Daily Procedure - Requests
on the TimeStar™ menu.
3. Click the ‘New Request’ button. The menu will open upwards and display additional options.
4. Click ‘Schedule Change Request’. The following window displays:
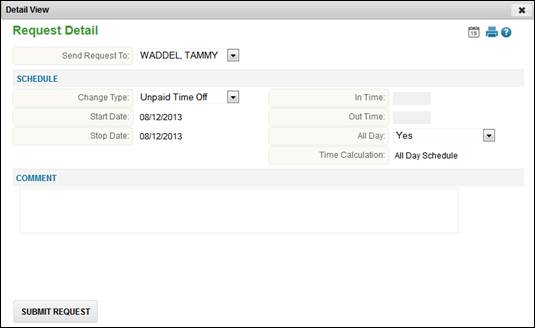
5. Use the drop-down to select which supervisor to send the request to.
6. Use the drop-down to select the type of schedule change request.
NOTE – You must enter each day as a separate request.
a. Unpaid Time Off: Remove scheduled time for a day and take unpaid time off.
b. Regular Schedule Override: Modify hours scheduled for a day.
c. Additional Scheduled Time: Add a new schedule for a day or add hours scheduled for a day.
d. Cancel Shift with Time Off: Remove any schedules that overlap the requested date and times off.
7. Enter the start and stop date this schedule change applies to.
8. To enter ‘In & Out’ times, uncheck the checkbox next to ‘All Day’ and then enter the times.
9. If needed, enter comments for your supervisor.
10. Click ‘Submit Request’. You will receive a message that the request has been sent to your supervisor and your request will be listed on the requests page with a status of unanswered.
After your supervisor has responded to the request(s) you have entered, you will receive a notification on the ‘Requests’ area on the home page.
To submit a General Request, follow these steps:
1. Login to TimeStar™.
2. Click
the Requests icon ![]() , or click Daily Procedure - Requests
on the TimeStar™ menu.
, or click Daily Procedure - Requests
on the TimeStar™ menu.
3. Click the ‘New Request’ button. The menu will open upwards and display additional options.
4. Click ‘General Request’. The following window displays:

5. Use the drop-down to select which supervisor to send your request to.
6. Enter the request details in the ‘Comment’ section.
7. Click ‘Submit Request’. You will receive a message that the request has been sent to your supervisor and your request will be listed on the requests page with a status of unanswered.
After your supervisor has responded to the request(s) you have entered, you will receive a notification on the ‘Requests’ area on the home page.
Submitting a Missing Punch Request
To submit a Missing Punch Request, follow these steps:
1. Login to TimeStar™.
2. Click
the Requests icon![]() , or click Daily Procedure - Requests
on the TimeStar™ menu.
, or click Daily Procedure - Requests
on the TimeStar™ menu.
3. Click the ‘New Request’ button. The menu will open upwards and display additional options.
4. Click ‘Punch Request’. The following window displays:

5. Use the drop-down to select which supervisor to send your request to.
6. Enter an ‘Actual Date/Time’ of the punch.
7. Use the drop-down to select a Punch Type.
8. Use the drop-down to select a Pay Type.
9. You may select different organization levels if needed.
10. Click ‘Submit Request’. You will receive a message that the request has been sent to your supervisor and your request will be listed on the requests page with a status of unanswered.
NOTE –Users may
also enter a missing punch request via the Punches page by clicking ![]() icon
next to the missing punch.
icon
next to the missing punch.
After your supervisor has responded to the request(s) you have entered, you will receive a notification on the ‘Requests’ area on the home page.
To submit a TimeStar™ message, follow these steps:
1. Login to TimeStar™.
2. Click
the Requests icon![]() , or click Daily Procedure - Requests
on the TimeStar™ menu.
, or click Daily Procedure - Requests
on the TimeStar™ menu.
3. Click the ‘Message’ button. The following window displays:

4. Use the selection box to select ‘Available’ recipients and add them to ‘Assigned’.
5. Use the drop-down to specify users in a certain organization level. Use the ‘Clear Filter’ button to clear the organization level filter.
6. Enter your message in the message box.
7. Click ‘Submit Request’. You will receive a message that the request has been sent to your supervisor and your request will be listed on the requests page with a status of unanswered.
After the user has responded to the request(s) you have entered, you will receive a notification on the ‘Requests’ area on the home page.
Cancel Requests
If a user has submitted a request and the current status is unanswered, the user can detail the request from the My Request page and click the ‘Withdraw Request’ button. The following detail will display for the employee:

After clicking ‘Withdraw Request’, the status will
be updated to Cancelled![]() . When the supervisor
views the ‘Employee Request panel, they will see a status of Cancelled
and No Action Required
. When the supervisor
views the ‘Employee Request panel, they will see a status of Cancelled
and No Action Required ![]() . Detailing the request
the supervisor will be able to ‘Recommend Approval of Request’ or Recommend
Denail of Request’. These options will not perform an action
and are simply an recommendation. The following detail will display for
the supervisor:
. Detailing the request
the supervisor will be able to ‘Recommend Approval of Request’ or Recommend
Denail of Request’. These options will not perform an action
and are simply an recommendation. The following detail will display for
the supervisor:

NOTE – The ‘Cancel Request’ button will only appear if employee has security ER Requests – Cancellation set to full access.
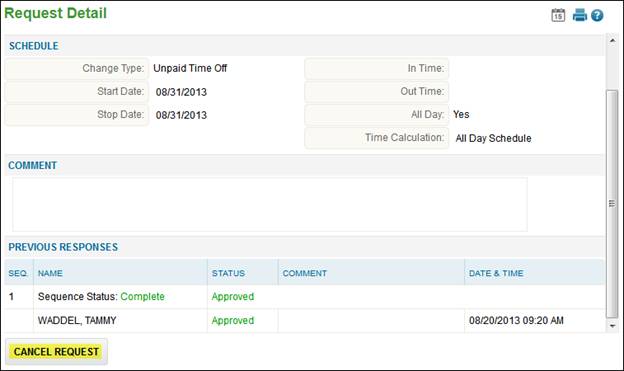
The following detail will display for the employee:
After clicking ‘Cancel Request’, a new cancellation request will appear as displayed below:
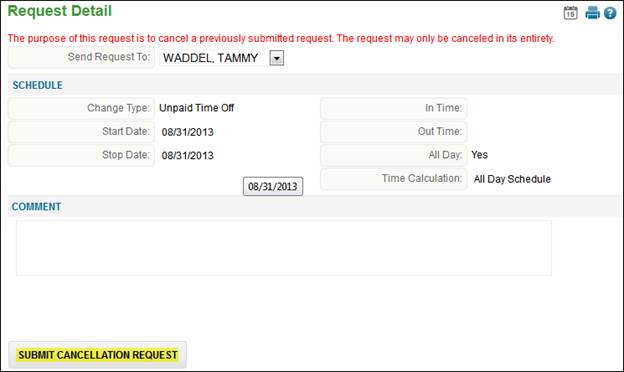
Click ‘Submit Cancellation Request’ to send to cancellation to the supervisor. A new request has been sent to the supervisor and displays with a status of unanswered. The original request remains as approved.
A supervisor can view the Cancellation request via the Employee Requests tab, the following detail will display:
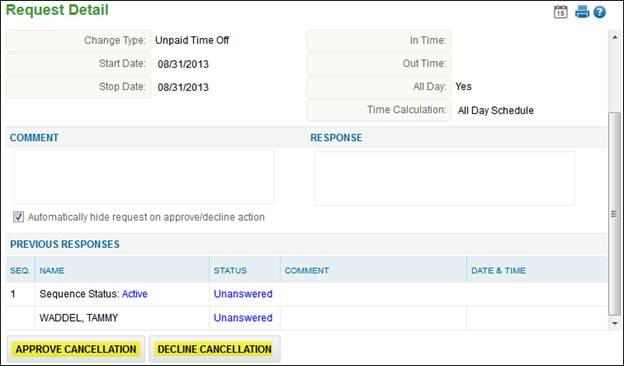
If the supervisor clicks ‘Approve Cancellation’ the
request will have a status of ‘Approved’ and the original request status
will be updated to Cancelled![]() . Any
hours, schedule or punch records that were created based on this request
will be removed. If the supervisor clicks ‘Decline Cancellation’
the request the status will appear as ‘Declined’ and the original request
will remain ‘Approved’.
. Any
hours, schedule or punch records that were created based on this request
will be removed. If the supervisor clicks ‘Decline Cancellation’
the request the status will appear as ‘Declined’ and the original request
will remain ‘Approved’.
Monitoring Requests
After an employee has submitted a request, a supervisor will receive a notification on the TimeStar™ Navigation Tree icon when logging in. An example of this is below:

If the user has access to the Employee Request Widget on the home page, requests sent to them can be monitored via the widget. Please see Widget section for more information.
You may view the requests submitted by employees by selecting the icon with the number of requests waiting or Daily Procedures - Requests from the TimeStar™ menu.
The ‘My Requests’ screen displays requests made by the user logged in. The following is an example of information that will display on the tab:

The ‘Employee Requests’ screen allows a supervisor to view a list of the supervisee requests waiting to be answered. The following is an example of information that will display on the tab:
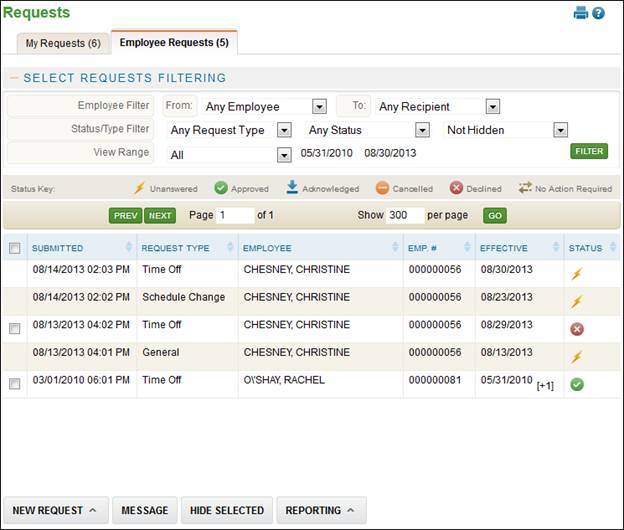
· Any TimeStar™ message requests will appear on the ‘Employee Requests’ screen.
· Use the Select Request Filtering section to display the requests you would like to see.
· If the user wants to display hidden requests, select the drop-down in the ‘Status/Type Filter’ to be ‘Including Hidden’, and then click ‘Filter’.
· The request list displayed may also be filtered by Employee, Supervisor, Request Type, Status Type, and Date.
· The requested date range may be used to display only requests that were submitted within a specific date range.
· Any requests can be hidden by marking the checkbox on the left and clicking ‘Hide Selected’ button.
· When viewing hidden requests, the checkbox on the left will not be available because the request has already been hidden from the initial view.
To assign a user the ability to respond to requests on a supervisor’s behalf in his/her absence, assign the ‘OP Requests – Disable Universal View’ security option set to ‘No Access’ to the user. The user will then have the ability to see all requests for all employees. The user may then filter the list by selecting the ‘Supervisor (to)’ drop-down and may respond to requests made to the supervisor. Please note users with this access may need to include hidden when acting on a supervisor’s behalf.
For details on how to submit a request, please see the previous section ‘Submitting a Request’.
To view the details of a request, follow these steps:
1. Login to TimeStar™.
2. Click
the ![]() icon
or go to Daily Procedures - Requests on the TimeStar™ menu.
icon
or go to Daily Procedures - Requests on the TimeStar™ menu.
3. Select the ‘Employee Requests’ page, if applicable.
4. A list of the unanswered requests will display.
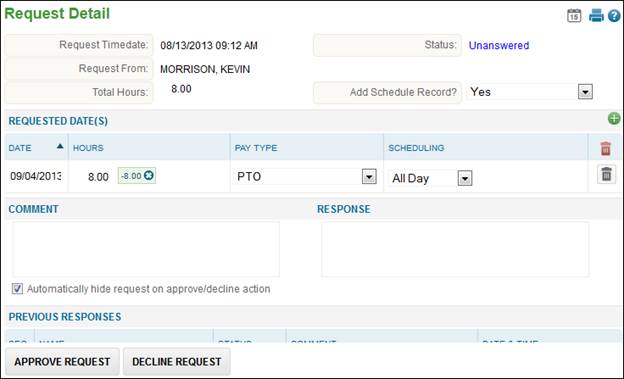
5. Select the request to show detail. The following window displays:
To respond to a request, follow these steps:
1. Detail the record, as previously described.
2. The following fields display:
a. Request Timedate: The date and time the employee submitted the request in TimeStar™.
b. Request From: Employee’s name who submitted the request.
c. Total Hours: The number of hours the employee expects to have applied for this request.
d. Status: The current status of the request
i. Unanswered: Response has not been submitted.
ii. Approved: Request has been approved.
iii. Cancelled: Request has been cancelled.
iv. Declined: Request has been denied.
v. No Action Required: No action is needed.
vi. Acknowledged: Message was read. Available for TimeStar™ Message and General requests only.
e. Comment: Comments the employee entered when submitting the request.
f. Response: Comments entered when responding to the request.
g. Previous Responses: Shows the order and status of the responses
h. Sequence Status: Active, Inactive, or Completed.
i. Status: The status that corresponds with each user’s response.
j. Comment: The response comment appears here.
k. Date & Time: Date & Time of the response.
3. Make any adjustments to the date(s) and other information as necessary.
a. To
deny part of the request (i.e. deny one day, but approve other days),
you may select the ![]() icon next to the date to deny.
icon next to the date to deny.
b. You may also add days (or separate out days if the request was submitted incorrectly), by selecting the ‘Add’ button.
4. Enter any comments in the ‘Response’ section.
5. Leave the ‘Automatically hide request on approve/decline action’ checked to hide request from the list after response. Uncheck it to keep the record in your list.
![]()
6. Select your response:
a. Select ‘Approve Request’ to approve the request.
b. Select ‘Decline Request’ to deny the request.
c. Select ‘X’ if you do not want to respond at this time.
7. After your reply has been submitted, the employee’s request notification will be updated detailing your response.
NOTE – TimeStar™ has the ability to send request information via email. Responses to request can be made through an email instead of users logging in to the system. Please contact Insperity Time and Attendance for more information on this functionality.