
Monitoring Requests
After an employee has submitted a request, a supervisor will receive a notification on the TimeStar™ Navigation Tree icon when logging in. An example of this is below:
If the user has access to the Employee Request Widget on the home page, requests sent to them can be monitored via the widget. Please see Widget section for more information.
You may view the requests submitted by employees by selecting the icon with the number of requests waiting or Daily Procedures - Requests from the TimeStar™ menu.
The ‘My Requests’ screen displays requests made by the user logged in. The following is an example of information that will display on the tab:

The ‘Employee Requests’ screen allows a supervisor to view a list of the supervisee requests waiting to be answered. The following is an example of information that will display on the tab:
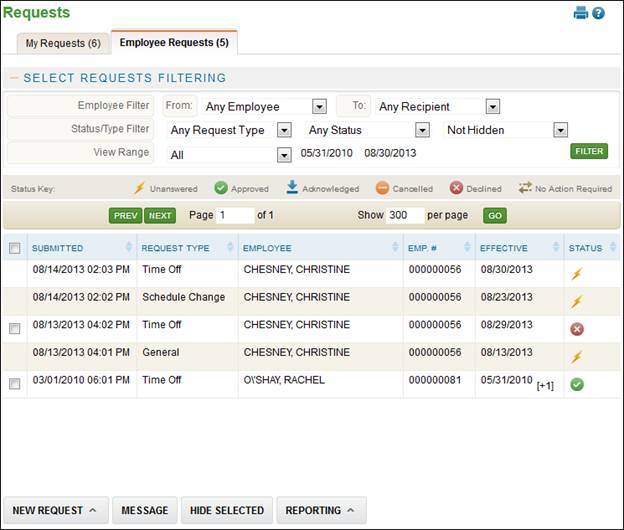
· Any TimeStar™ message requests will appear on the ‘Employee Requests’ screen.
· Use the Select Request Filtering section to display the requests you would like to see.
· If the user wants to display hidden requests, select the drop-down in the ‘Status/Type Filter’ to be ‘Including Hidden’, and then click ‘Filter’.
· The request list displayed may also be filtered by Employee, Supervisor, Request Type, Status Type, and Date.
· The requested date range may be used to display only requests that were submitted within a specific date range.
· Any requests can be hidden by marking the checkbox on the left and clicking ‘Hide Selected’ button.
· When viewing hidden requests, the checkbox on the left will not be available because the request has already been hidden from the initial view.
To assign a user the ability to respond to requests on a supervisor’s behalf in his/her absence, assign the ‘OP Requests – Disable Universal View’ security option set to ‘No Access’ to the user. The user will then have the ability to see all requests for all employees. The user may then filter the list by selecting the ‘Supervisor (to)’ drop-down and may respond to requests made to the supervisor. Please note users with this access may need to include hidden when acting on a supervisor’s behalf.
For details on how to submit a request, please see the previous section ‘Submitting a Request’.
To view the details of a request, follow these steps:
1. Login to TimeStar™.
2. Click
the ![]() icon
or go to Daily Procedures - Requests on the TimeStar™ menu.
icon
or go to Daily Procedures - Requests on the TimeStar™ menu.
3. Select the ‘Employee Requests’ page, if applicable.
4. A list of the unanswered requests will display.
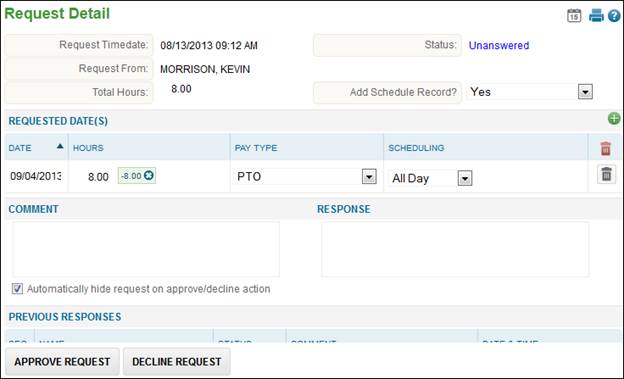
5. Select the request to show detail. The following window displays:
To respond to a request, follow these steps:
1. Detail the record, as previously described.
2. The following fields display:
a. Request Timedate: The date and time the employee submitted the request in TimeStar™.
b. Request From: Employee’s name who submitted the request.
c. Total Hours: The number of hours the employee expects to have applied for this request.
d. Status: The current status of the request
i. Unanswered: Response has not been submitted.
ii. Approved: Request has been approved.
iii. Cancelled: Request has been cancelled.
iv. Declined: Request has been denied.
v. No Action Required: No action is needed.
vi. Acknowledged: Message was read. Available for TimeStar™ Message and General requests only.
e. Comment: Comments the employee entered when submitting the request.
f. Response: Comments entered when responding to the request.
g. Previous Responses: Shows the order and status of the responses
h. Sequence Status: Active, Inactive, or Completed.
i. Status: The status that corresponds with each user’s response.
j. Comment: The response comment appears here.
k. Date & Time: Date & Time of the response.
3. Make any adjustments to the date(s) and other information as necessary.
a. To
deny part of the request (i.e. deny one day, but approve other days),
you may select the ![]() icon next to the date to deny.
icon next to the date to deny.
b. You may also add days (or separate out days if the request was submitted incorrectly), by selecting the ‘Add’ button.
4. Enter any comments in the ‘Response’ section.
5. Leave the ‘Automatically hide request on approve/decline action’ checked to hide request from the list after response. Uncheck it to keep the record in your list.
![]()
6. Select your response:
a. Select ‘Approve Request’ to approve the request.
b. Select ‘Decline Request’ to deny the request.
c. Select ‘X’ if you do not want to respond at this time.
7. After your reply has been submitted, the employee’s request notification will be updated detailing your response.
NOTE – TimeStar™ has the ability to send request information via email. Responses to request can be made through an email instead of users logging in to the system. Please contact Insperity Time and Attendance for more information on this functionality.