Generate Reports
The Generate Reports page is where you will find any TimeStar™ standard reports, as well as any custom reports your company may have. To see a full list and summary of available reports see Appendix G. For samples of the report layouts and filter options, please reference the TimeStar™ Reports Manual.
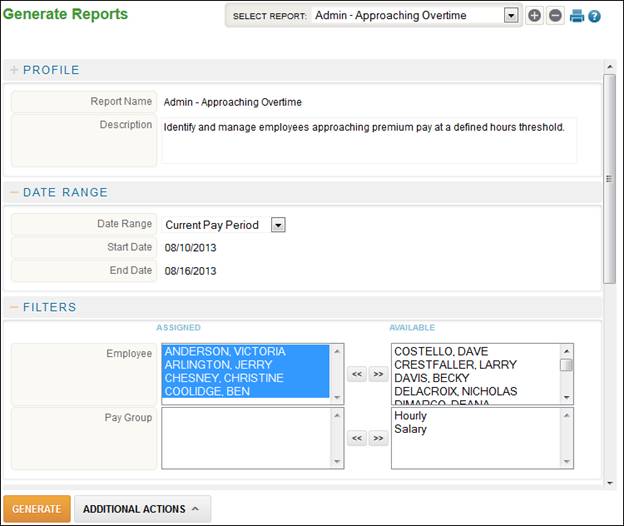
The Generate Reports page has been separated into sections. Available sections include Profile, Date Range, Filters, Parameters, Sorting and Output.
Sections may be expanded by selecting the ![]() icon. Sections may be collapsed by selecting the
icon. Sections may be collapsed by selecting the ![]() icon. The following is what displays after selecting Generate Reports from the navigation tree:
icon. The following is what displays after selecting Generate Reports from the navigation tree:
To generate a report, the following steps are necessary:
1. Select the report from the ‘Select Report’ drop-down.
2. Enter the date range.
3. Select the employee(s).
4. Select other parameters and sorting options that may apply.
5. Click the ‘Generate’ button.
Date Range presets are available for commonly used ranges. To generate the report for a preset not available, select ‘Custom Range’.
Reports formats can be all of the following formats, .pdf, .doc, .rtf, .xls, .txt.

Report templates can be created to allow for generation of reports with predefined settings for future use. Within a report template, options for generating the report can be saved for future use. For example, sort orders can be defined without requiring an additional selection before generating a report.
To update the default options for a standard report, follow these steps:
1. Login to TimeStar™.
2. Select Reports – Generate Reports.
3. Select the report to be saved as a template from the ‘Select Report’ drop-down.
4. Make the standard selections, i.e. employee filters, date range, sort orders, parameter options.
5. At the bottom of the screen, click the ‘Additional Actions’ drop-down.
6. To save the report as a new option in the drop-down, click ‘Save Report’.
7. A confirmation message will appear that the report template was successfully saved.
There are two types of templates: personal and shared. A personal template is a report option only the user who created the template can see. A shared template is a report option that all users can see, provided additional security limiting the generation of the report has not been set. For example, if an employee does not have access to generate the Admin – Approaching Overtime report, even if a template is shared, they will not see the template option(s) for the Admin – Approaching Overtime report.
To create a template, a user must have certain security rights specified. Under System Setup –User Permissions or System Setup – Group Permissions, a user must have Report Generator – Personal security mask set to full access to create a personal template. A user must have Report Generator – Shared security mask set to full access to create a shared template. If a user is currently setup with all ER (employee) access, select ER Report Generator – Personal or Shared. If a user is currently setup with both ER and SUP (supervisor) access, both the ER and SUP options must be selected for the security mask.
To allow a user to change the default options that appear on the standard report via the Report Maintenance page, set the Report Generator – System security mask to full access.
NOTE – The Report Maintenance option is only recommended for administrators.
To create a report template, follow these steps:
1. Login to TimeStar™.
2. Select Reports – Generate Reports.
3. Select the report from the ‘Select Report’ drop-down.
4. Make the standard selections, i.e. employee filters, date range, sort orders, parameter options.
5. At the bottom of the screen, click the ‘Additional Actions’ button.
6. To save the report as a new option in the drop-down, click ‘Save As’.
7. Enter the Name and Description for the new template.
8. Click the ‘Save’ button. The report is now a personal template.
9. To share the report, click the ‘Additional Actions’ drop-down and click ‘Share’.

10. Template reports will appear at the top of the reports list.
To create a report favorite, follow these steps:
1. Login to TimeStar™.
2. Select Reports ![]() from the navigation menu.
from the navigation menu.
3. Select the report to save as a favorite from the appropriate section.
4. Hover over the report name until the icons appear.
5. When the icons appear, click the star ![]() to add it to your favorites.
to add it to your favorites.
6. The favorite will appear under Reports section in the navigation tree when the ![]() button is selected.
button is selected.
Report security is enforced, so if a user does not have access to generate a specific report, access is not granted to any of the template(s) created for that report.