The Employee Maintenance section contains two parts, Employee Information and Employee Assignments. The employee information section includes Accrual Summary, Contact Info, Pay History (if applicable), and Profile. The employee assignment section includes Accrual Plans, Groups, Input Devices, Labor Allocations, Org Levels, Scripts, Secondary Rates, and Supervisors.
All assignments made within Insperity TimeStar™ are point in time, meaning that effective and stop dates are used for assignments and a history is kept of all assignments. For this reason, please be aware that a previous assignment could be overwritten if the effective date for a new assignment is before the start date of an existing assignment.
NOTE – The employee needs to be a user in TimeStar™ in order to use the application. Please see the Security section to create users in the system.
Employee Information - Accrual Summary
The TimeStar™ application is versatile enough to allow you to transfer accrual balance information from an outside application, or calculate accrual data within the system.
TimeStar™ may be setup to deduct hours taken from the different accrual plans. Accruals may also be setup to calculate based on eligibility rules.
To have TimeStar™ setup to deduct taken time from accruals or calculate accruals, please contact an Insperity Time & Attendance Professional Services Representative for assistance.
Adding/Editing/Viewing Accrual Information
Employee Maintenance –Employee Information - Accrual Summary
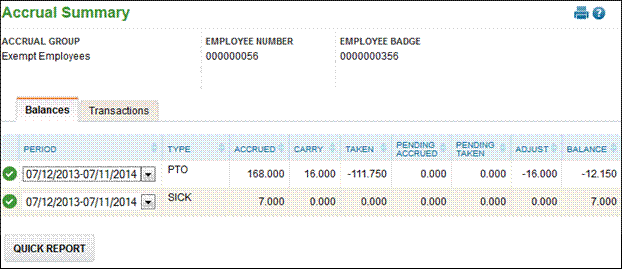
· The Accrual Summary page displays 2 tabs, Balances and Transactions.
· On the Balances tab, you have the ability to view balance information for each accrual plan assigned to an employee.
· Use the ‘Period’ drop-down to view accrual information for the previous and next accrual periods.

Field Name |
Description |
Period |
The accrual period for the balance displayed. Select the drop-down to switch accrual periods to view balance information. |
Type |
The accrual plan defined in Company Setup–Accruals Setup – Accrual Plans. |
Accrued |
Hours accrued in previous pay periods. |
Carry |
Carryover hours from previous accrual years. |
Taken |
Hours taken in previous pay periods. |
Pending Accrued |
Hours set to become accrued in the current period or in future pay periods. |
Pending Taken |
Hours set to be taken in the current period or in future pay periods. |
Adjust |
The total hours of manual adjustment records. These adjustment records may have been entered by a user or created during a conversion from an earlier version of TimeStar™. |
Balance |
The current balance for the accrual plan. |
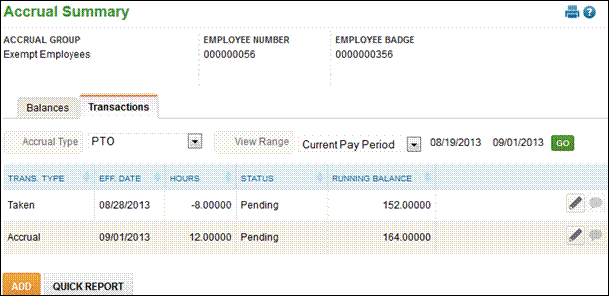
The other view on the Accrual Summary page is Accrual Transactions, ‘Transactions’ tab. Below is an example of information that appears on this tab:

On this tab, all accrual transactions will appear in a sequential list by effective date. Specific date ranges may be specified to view this page.
When this page is initially selected, the first accrual plan’s transactions for the current pay period will be displayed. Use the ‘Accrual Type’ drop-down to switch to another accrual plan. Use the ‘View Range’ drop-down to view transactions by a different date range.
Field Name |
Description |
Trans.Type |
The type of accrual transaction. Available transaction types include Accrual, Accrual Adjustment, Beginning Balance, Carryover, Carryover Adjustment, Expired, Manual Adjustment, Taken and Taken Adjustment. |
Eff. Date |
The effective date for the transaction type. |
Hours |
The hours amount of the transaction. |
Status |
Indicator if the transaction is pending (taken or accrued in the current period or into the future). Transactions that are pending will be denoted with ‘Pending’ in the ‘Pending’ column. Transactions that are no longer pending will be denoted with ‘Closed’ in the ‘Pending’ column. |
Running Balance |
The running balance of the accrual type |
To add an accrual adjustment:
1. On the ‘Transactions’ tab, click the ‘Add’ button. The following window displays:

2. Use the drop-down to select Accrual Type.
3. Select the Transaction Type.
4. Enter Adjustment Hours.
5. Enter Effective Date.
6. Enter a Comment if needed.
7. Click the ‘Save’ button.
NOTE - Adjustment hours entered with type ‘Manual Accrual’ or ‘Manual Taken’ will appear in the ‘Pending Accrued’ or ‘Pending Taken’ column on the Accrual Summary page until the pay period that includes the adjustment date is ended.
To edit an Accrual Adjustment:
1. Click
the ![]() icon
to the right of the record to edit.
icon
to the right of the record to edit.
2. Edit the information. The only fields that may be edited for an existing transaction are Transaction Type, Adjustment Hours, Effective Date and Comment.
3. Click the ‘Save’ button.
NOTE – Only manual adjustment transactions in the current period and forward may be edited. System generated transactions may not be edited at any time.
To delete an Accrual Adjustment:
1. Click
the ![]() icon
to the right of the record to be deleted.
icon
to the right of the record to be deleted.
2. You will receive this warning message – ‘You are about to permanently delete this attendance record. This action can NOT be undone! Continue?’ Click ‘Ok’ to delete the record, click ‘Cancel’ to keep the record and close the message.
TimeStar™ may be configured to suspend employee accrual calculations for a period of time. Employee accruals will not calculate during the suspension period defined and will begin on the day after the suspension period.
To setup accruals suspension see Appendix A or contact Insperity Time & Attendance Professional Services for assistance.