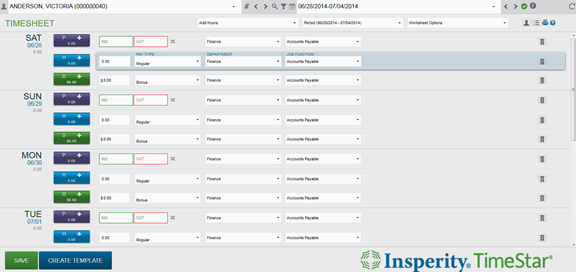
Data Entry - Timesheet
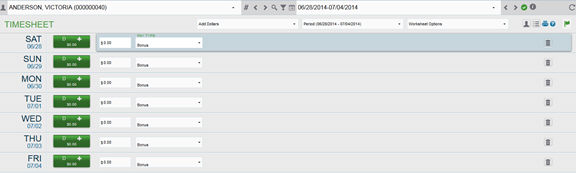
The Timesheet page can be setup to display an employee’s punches, hours, dollars, mileage, and/or units. Timesheet is configured via the Company Setup – Timesheet Setup page. Saved Timesheets can be applied to groups of employees from the Company Setup - Pay Groups – Timesheet tab. Below is an example Timesheet configuration:
Adding/Editing/Deleting Data via Timesheet
Please note that the following steps may vary depending on your company’s setup.
![]()
After clicking Data Entry – Timesheet, a drop-down list for available Timesheets appears along with a View drop-down to choose the period or specific weeks to display. The initial view for this screen is for the entire pay period for the employee selected. You may use the drop-down on the top of the screen to select a different employee or pay period.
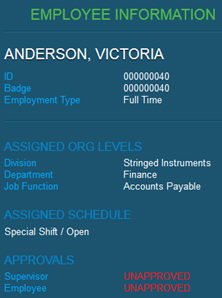
Employee Information can be found on this page by
clicking the ![]() icon to the right
of the toolbar. The information appears on this pop out includes
employee name, ID, badge, home organization levels, assigned schedule
group, current approval status, and pending requests.
icon to the right
of the toolbar. The information appears on this pop out includes
employee name, ID, badge, home organization levels, assigned schedule
group, current approval status, and pending requests.
Each data type will display with a separate color. Below is what each data type row looks like:
Punches -

Hours –

Dollars –

Units –

Mileage –

To add hours, follow these steps:
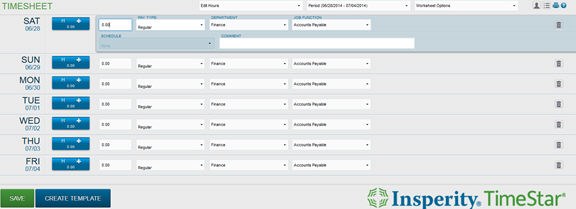
1. Select the Date to add a record for.
2. Enter the number of hours to the Hours column.
3. Use the ‘Pay Type’ drop-down and change the pay type.
4. Use the Schedule drop-down and select ‘Day Off’ to assign a time off schedule deviation for the entire day if applicable.
5. Enter a comment if applicable.
6. Use the drop-downs to select any organization level overrides if applicable.
7.
If necessary, you may add another line to a day by clicking the ![]() icon
on the right side. This will enable you to enter additional hours record
for that day.
icon
on the right side. This will enable you to enter additional hours record
for that day.
8. Click ‘Save’ to save records.
9. A green message stating “Timesheet Saved” will appear. If there is any invalid or missing data it will appear in red.
To add punches, follow these steps:
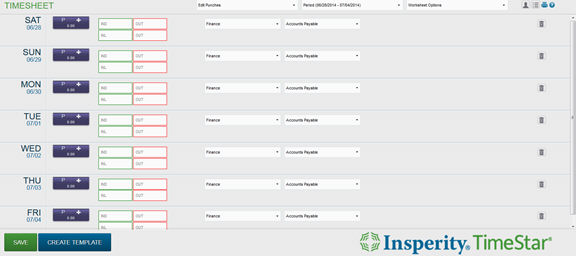
1. Select the Date to add punches for.
2. Enter times in the green and red outlined fields.
a. If the ‘Allow Transfer’ setting is applied, click
the ![]() icon to enter a transfer punch.
icon to enter a transfer punch.
NOTE– You do not need to complete all fields on a line. For example, if an employee did not punch out for lunch, you may complete the IND and OUT items for that line.
3. Use the drop-downs to select any organization level overrides if applicable.
4. You may add another line to a day by clicking the
![]() icon on the right side. This will enable you
to enter additional punches if needed.
icon on the right side. This will enable you
to enter additional punches if needed.
5. Click ‘Save’ to save records.
6. A green message stating “Timesheet Saved” will appear.If there is any invalid or missing data it will appear in red.
NOTE – If the ‘Require Valid Punch Pairs’ setting is set to ‘Yes’, a valid IN/OUT combination will need to be entered before saving the Timesheet.
To add dollars, follow these steps:
1. Select the Date to add dollars for.
2. Enter amount in Dollars field
3. Enter pay type.
4. Enter a comment if applicable.
5. Use the drop-downs to select any organization level overrides if applicable.
6. You may add another line to a day by clicking the
![]() icon on the right side of the screen. This
will enable you to enter additional dollars for the day.
icon on the right side of the screen. This
will enable you to enter additional dollars for the day.
7. Click ‘Save’ to save records.
8. A green message stating “Timesheet Saved” will appear.If there is any invalid or missing data it will appear in red.
NOTE – Fields to enter will vary with individual Timesheet Setup configurations.
To add mileage, follow these steps:

1. Select the Date to add mileage for.
2. Enter values Begin and End Miles. Note some users may only see Total Miles fields. Totals will automatically be updated based on these values.
3. Select the Vehicle.
4. Select the pay type.
5. Enter a comment if applicable.
6. Use the drop-downs to select any organization level overrides if applicable.
7.
You may add another line to a day by clicking the ![]() icon on the right side of the screen. This will enable you to enter
additional mileage records for the day if needed.
icon on the right side of the screen. This will enable you to enter
additional mileage records for the day if needed.
8. Click ‘Save’ to save records.
9. A green message stating “Timesheet Saved” will appear.If there is any invalid or missing data it will appear in red.
To add units, follow these steps:

1. Select the Date to add units for.
2. Enter amount in Units field.
3. Enter Units type.
4. Enter a comment if applicable.
5. Use the drop-downs to select any organization level overrides if applicable.
6.
You may add another line to a day by clicking the ![]() icon on the right side of the screen. This will enable you to enter
additional units for the day if needed.
icon on the right side of the screen. This will enable you to enter
additional units for the day if needed.
7. Click ‘Save’ to save records.
8. A green message stating “Timesheet Saved” will appear.If there is any invalid or missing data it will appear in red.
To edit existing records to any of the sections, follow the steps below:
1. Update the appropriate section with the changes.
2. Click ‘Save’.
3. A green message stating “Timesheet Saved” will appear. If there is any invalid or missing data it will appear in red.
NOTE – Not all setups will display existing records.
To delete records via Timesheet, follow the steps below:
1. Click
the![]() button
to delete the record.
button
to delete the record.
2. Click ‘Save’
3. A green message stating “Timesheet Saved” will appear.
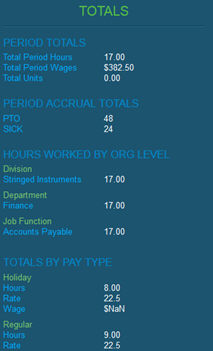
The Totals section can be found by clicking the ![]() icon on the right of the toolbar. Items that display
on the Employee Totals section are chosen on the Timesheet Setup page.
The following are options available to be displayed from this section,
period totals, period accrual totals, hours worked by org level, and totals
by pay type.
icon on the right of the toolbar. Items that display
on the Employee Totals section are chosen on the Timesheet Setup page.
The following are options available to be displayed from this section,
period totals, period accrual totals, hours worked by org level, and totals
by pay type.
Follow these steps to create and apply a timesheet template.
1. Click the ‘Create Template’ button.
2. Enter information to save as a template to reuse.
3. Click ‘Save Template’ button.
4. Message appears that “Timesheet Template successfully saved”.
5. Click ‘Back to Timesheet’ button to return to timesheet page.
NOTE – If you made changes on the template screen without saving, a message will state “Your changes have not been saved. Press OK to continue without saving those changes.” Click ‘Cancel’ to return to the template screen.
6. Click ‘Use Template’ to apply the template created.
7. To save the Timesheet click ‘Save’.
8. To go back and edit the template click ‘Edit Template’.
NOTE – Templates will only be saved for the specific employee it was created for.