
Data Entry - Dollars
The Dollars page can be utilized to enter dollar amounts within TimeStar™. The following fields appear on the page:
NOTE- If your company uses quick reports click the ‘Reporting’ option and then click ‘Dollars Report’. A new window will display the report.
|
Field Name |
Description |
|
Effective |
The date that the dollars are effective |
|
Dollars |
Number of dollars associated with the record. |
|
Pay Type |
Pay type that is applied to the Dollars record. |
|
Device |
Device Number. |
|
Source |
Source Code. |
|
|
Select this icon to edit any details of the Dollars record. |
|
|
Select this icon to delete the Dollars record. |
|
|
Select this icon to view the details of the audit log associated with the Dollars record. This is only available if the System Parameters – Audit Trail is set to Yes. |
Adding/Editing/Viewing Dollars
To add Dollars:
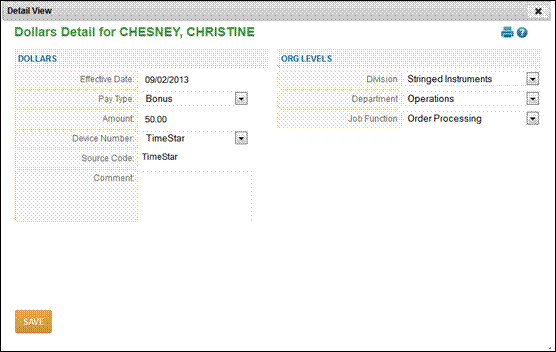
1. Click the ‘Add Dollars’ button.
2. Edit the ‘Effective Date’ to reflect the day to add Dollars.
3. Select a dollars pay type.
4. Enter the dollar amount.
5. Make any additional changes and click the ‘Save’ button.
|
Field Name |
Description |
|
Effective Date |
The date that the dollars are effective |
|
Pay Type |
Pay type to be applied to the dollars |
|
Amount |
Number of dollars to grant the employee with the Dollars record |
|
Device Number |
The device that the Dollars record originated from. When adding a Dollars record in TimeStar™, the device number will be TimeStar™. |
|
Source Code |
The Source Code defaults to a value of TimeStar™. |
|
Comment |
Enter any comment to have associated with the Dollars record. |
|
Organization Level Drop-downs |
Use these drop-downs to override the organization levels assigned |
To edit Dollars:
1. Click the ![]() icon to the right of the record to edit.
icon to the right of the record to edit.
2. Edit any fields needed.
3. Enter comment.
4. Click ‘Save’.
NOTE – Dollars records may also be edited on the main Dollars page without selecting the ![]() icon. You may also edit any of the fields that are shown on the main Dollars page and select ‘Save’ to apply any changes.
icon. You may also edit any of the fields that are shown on the main Dollars page and select ‘Save’ to apply any changes.
To delete Dollars:
1. Click the ![]() icon to the right of the record to delete.
icon to the right of the record to delete.
2. You will receive a warning message - to delete, click ‘OK’, or to cancel, click ‘Cancel’.
Mileage is one of Insperity Time and Attendance’s additional optional modules for purchase.
Before mileage may be entered in TimeStar™, vehicles and pay types must be setup. To setup vehicles in TimeStar™, follow these steps:
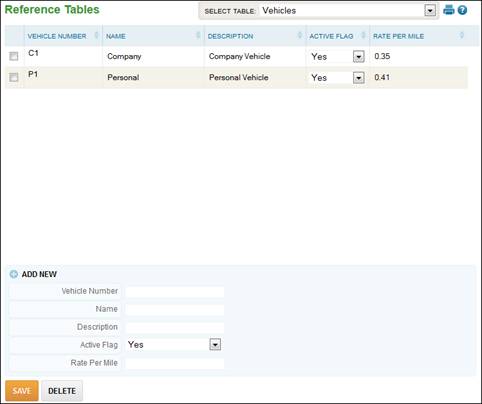
1. Select System Setup– Reference Tables page.
2. From the ‘Select Table’ drop-down find ‘Vehicles’.
3. Click ‘Add New’.
4. All fields on the screen are required.
a. Vehicle number, name, description, active flag, and rate per mile.
b. The rate per mile may be up to 3 decimal places.
5. Click the ‘Save’ button.
To setup pay types for the mileage module, follow these steps:
1. Select System Setup – Reference Tables.
2. From the ‘Select Table’ drop-down find ‘Pay Types’.
3. Add pay types or modify existing pay types. All fields are required. In order for a pay type to appear on the mileage screen, the dollars flag and mileage flag must be set to ‘Yes’.
4. Apply a pay factor (this value will be used in calculating the mileage dollar amounts).
5. Click the ‘Save’ button.
Assigning a Default Vehicle to Employees
To simplify employee’s entry of mileage, you may assign employees to a default vehicle.
To assign a default vehicle to an employee, follow these steps:
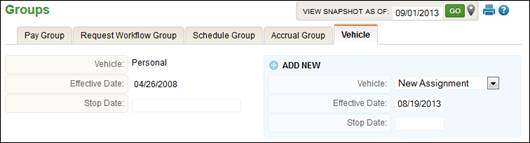
1. Select Employee Maintenance – Employee Assignments – Groups.
2. Select the Vehicle tab.
3. Use the drop-down under the ‘Add New’ section to select a ‘Vehicle’.
4. Enter an effective date for the assignment.
5. Click the ‘Save’ button.
The mileage entry screen resides on the Dollars panel. For this reason, employees must be given view access to the Dollars panel in addition to mileage security options. The minimum fields that must be available are effective date, pay type, vehicle number, and begin miles/end miles or total miles.
Adding/Editing/Viewing Mileage Information
To Add Mileage:
Click the ‘Add Mileage’ icon on the Dollars page and the following page will display:
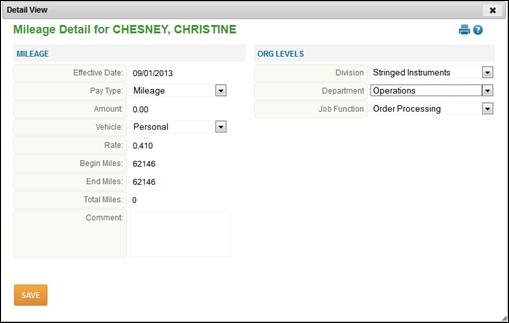
Enter required information
o Effective date.
o Pay Type – only pay types with the dollar flag set to ‘Yes’ under System Setup – Reference Tables will be listed.
o Amount – calculation of the total miles multiplied by the rate – cannot be edited.
o Vehicle – if default vehicle is specified, the vehicle will be selected.
o Rate – may be edited if the employee is given the access right to do so.
o Begin – will default to one mile after the last entry made.
o End – will default to one mile after the last entry made.
o Total Miles – difference between begin and end mileage. This field may not be edited if the begin and end mileage fields are enabled.
o Comment.
o Organization level information may be changed.
o Click the ‘Save’ button.
To edit mileage:
· Click the ![]() icon to the right of the record to edit.
icon to the right of the record to edit.
· Edit any information.
· Click the ‘Save’ button.
To delete mileage:
· Click the ![]() icon to the right of the record to delete.
icon to the right of the record to delete.
· You will receive a warning message - if you want to delete, click ‘OK’. If you want to cancel, click ‘Cancel’.
When the mileage option is available, the ‘Add Mileage’ button will be displayed next to the ‘Add Dollars button’.
After mileage has been entered, the record will display on the Dollars panel with the dollar amount awarded.
NOTE – if the user is granted only view access to the Dollars panel, the ‘Add Dollars’ and ‘Save’ buttons will not be available.